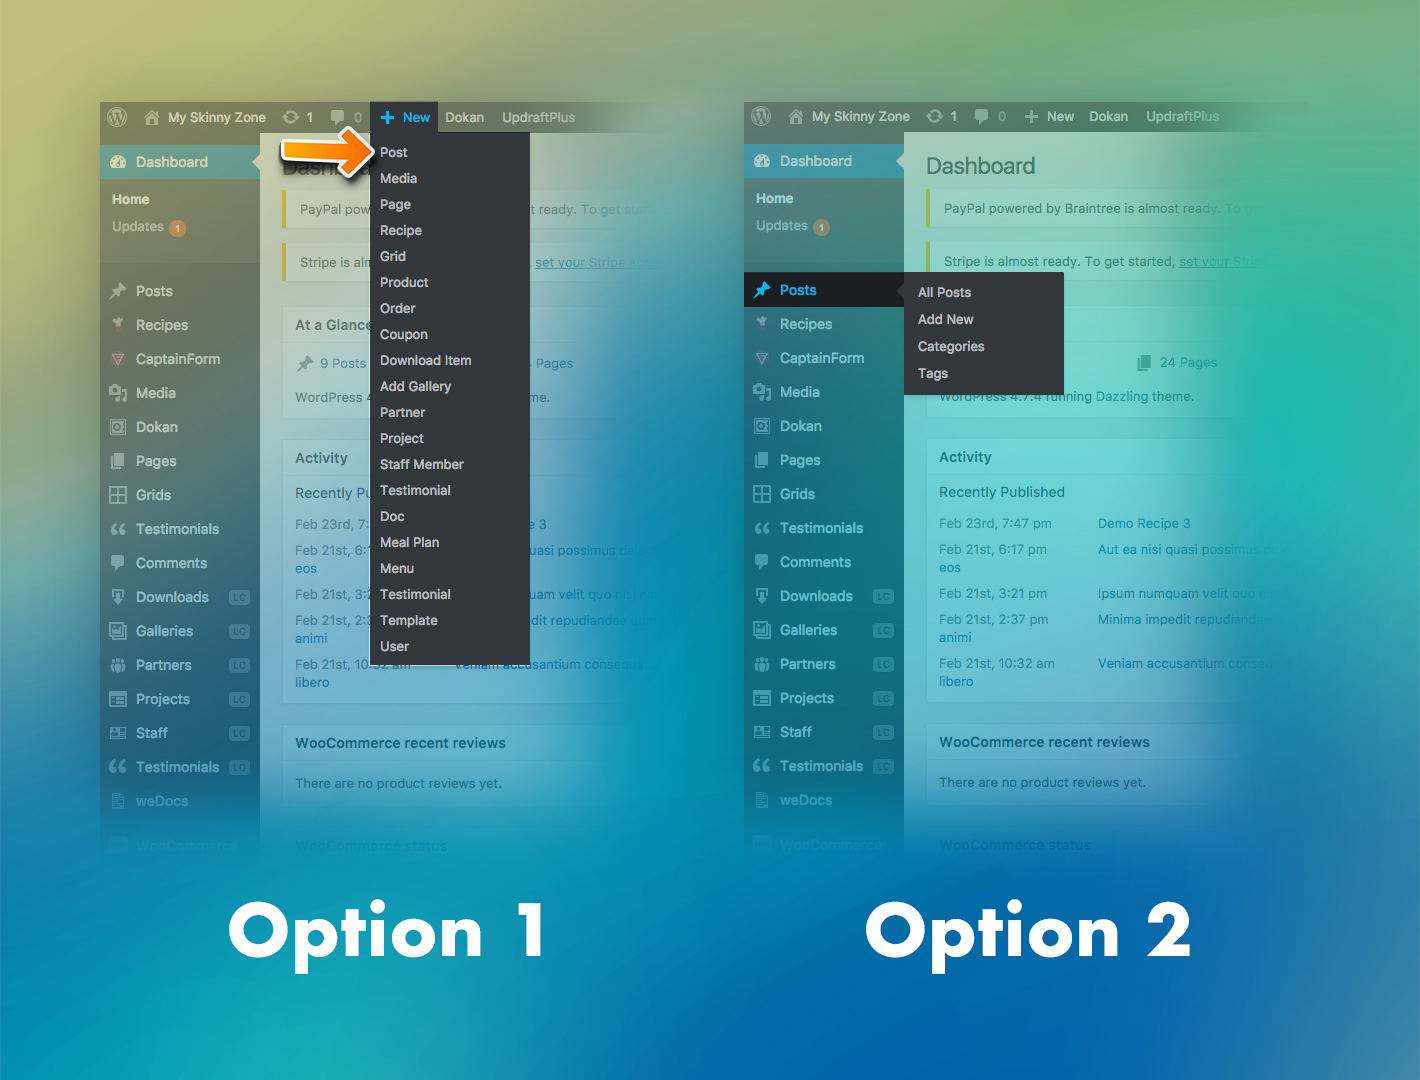
- Option 1
- Go to the TOP MENU | NEW -> POST
- Option 2
- Go to the SIDE MENU | POSTS -> ADD NEW
Using the OPTION 2 you can also see all your articles (ALL POSTS), check your categories (CATEGORIES) and check your tags (TAGS).
INSERTING THE CONTENT
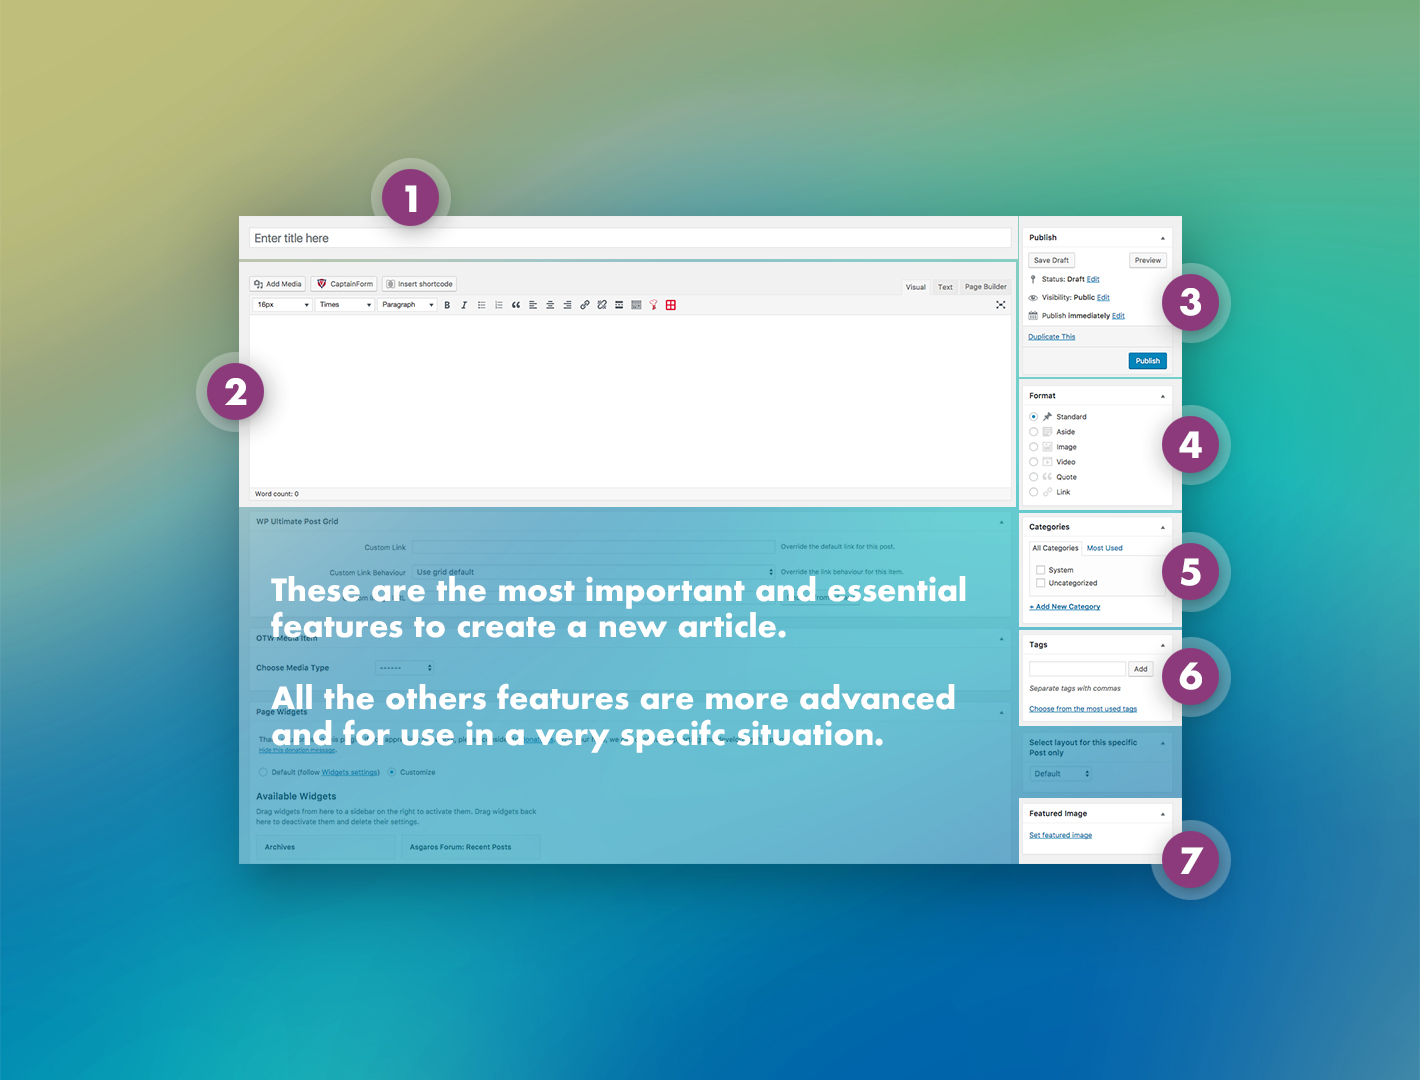
- 1 – The title of your article.
Note that the final URL address for this article is made based on the name of the article.
After you put the name and start to put the content, the system will generate a URL address based on the name.
You can also edit this URL clicking in the button EDIT (this button is only enabled after you start to create the content).
- 2 – This is your editor. Here you will put all your content.
There are some simple text and media tools. Some special buttons are used to create specific contents, like recipes or forms.
Note there are some tabs on the top-right side. These tabs change the way you can put the content.- tab VISUAL: you can put text and media directly.
- tab TEXT: in this mode, you can edit the source code or insert some specific HTML code inside your article.
- tab PAGE BUILDER: this tab activates a special plugin used to create content based on modules. It’s an “easy to use” way to create complex content.
- 3 – This is where you control the publishing of your article.
Here you can set the status, visibility and the schedule of your article.
Also is possible to check how many revisions you have made.
After create or edit the article, do not forget to save/update/publish.
- 4 – Here you can choose the format/style of your article.
- ASIDE – Typically styled without a title. Similar to a Facebook note update.
- GALLERY – A gallery of images. The post will likely contain a gallery shortcode and will have image attachments.
- LINK – A link to another site. Themes may wish to use the first <a href=””> tag in the post content as the external link for that post. An alternative approach could be if the post consists only of a URL, then that will be the URL and the title (post_title) will be the name attached to the anchor for it.
- IMAGE – A single image. The first <img /> tag in the post could be considered the image. Alternatively, if the post consists only of a URL, that will be the image URL and the title of the post (post_title) will be the title attribute for the image.
- QUOTE – A quotation. Probably will contain a blockquote holding the quote content. Alternatively, the quote may be just the content, with the source/author being the title.
- STATUS – A short status update, similar to a Twitter status update.
- VIDEO – A single video or video playlist. The first <video /> tag or object/embed in the post content could be considered the video. Alternatively, if the post consists only of a URL, that will be the video URL. May also contain the video as an attachment to the post, if video support is enabled on the blog (like via a plugin).
- AUDIO – An audio file or playlist. Could be used for Podcasting.
- CHAT – A chat transcript.
Note these formats/styles depends on the WordPress theme you are using. Some formats/styles are not supported by some themes.
- 5 – The category selection.
Before post your article, you must select a category.
Categories are useful to organize your articles, make easy to search engines find your content and put your content in the right place.
Some positions and pages of your WordPress site are specific for each category.
This means some categories will be displayed in some pages or some specific positions on the layout.
It’s also possible to create/delete categories on the menu POSTS -> CATEGORIES (as shown in the first image).
- 6 – Tags panel.
Tags are keywords about the main content of your article with the advantage of a link.
This mean when you create a tag for your article, if any other article has the same tag, both article will be linked.
The visitor of your website can click on this link to be guided trough several other articles related to these tags.
Besides this, the search engines can use tags to link and create a relation between your articles increasing the relevance of your content.
Also, you can create new general tags to be used on several articles using the menu POSTS -> TAGS (as shown in the first image).
So it’s highly recommended use some tags in each article you create.
- 7 – Adition featured image.
In this panel, you can add an exclusive image to be the featured image of your article.
By default, WordPress use the images inside your article to put it on the front page and link to your article.
If your article doesn’t have an image or if you want a different image to be used on the front page, you can use this option to set a new image.